Introduction
In Liferay it is tough to handle scenarios like storing large data files such as video and audio files. For carrying out general maintenance operations such as upload, update, copy, move and delete etc… Liferay might consume more memory and hence we need to scale up Liferay further more to maintain such objects. So for these mentioned scenarios it’s better to utilize the best scalable data storage options such as Amazon S3 (Simple Storage Service) Bucket.
The main concern or focus of this portlet is about storing files which have large data, although we can store any size or type of data files inside the S3 Bucket as Objects. KTree S3 maintenance portlet provides all major features that can be performed with S3 Bucket.
Getting Started
This portlet works on Liferay 6.1+ and 6.2+ version. First we need to download the portlet from market place and deploy. Once this is done, the administrator can deploy the portlet to any page in the portal communities. This portlet can be found under KTree category and few configurations are required for Vaadin table compilation. Below is a screenshot of the portlet regarding where it is placed on the page :
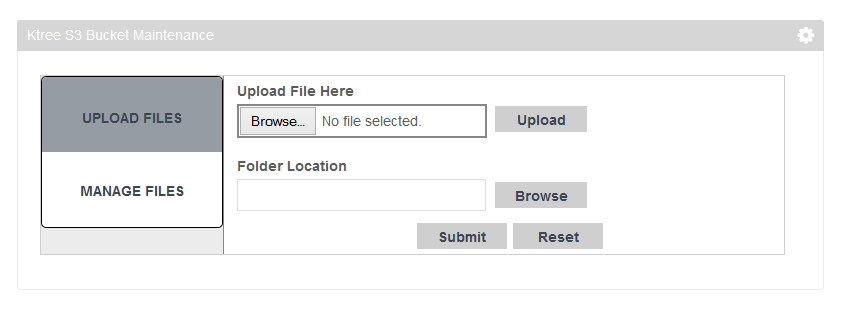
In this portlet we have two vertical tabs namely ‘UPLOAD FILES’ and ‘MANAGE FILES’ and by default UPLOAD FILES tab will be displayed. ‘UPLOAD FILES’ tab is responsible to upload and define URL exceptions which occur during upload to the S3 bucket. ‘MANAGE FILES’ is used to navigate through the bucket objects such as various folders and files and also provide few operations which helps us to manage S3 documents such as moving, copying and deleting documents.
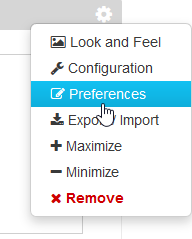
Setting Preferences
Once after the portlet is deployed and plotted to page, We need to set few preferences in-order to map S3 bucket. First under the portlet settings icons select ‘Preferences’ to map S3 Bucket. User need to add AWS key set to access the bucket data. Below screenshots describes on how to set up preferences,
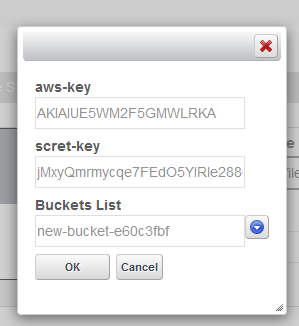
After adding the aws-key and secret-key , User will get a list of S3 buckets which are authorized. We can pick any one bucket from the list and then select ‘OK’ to complete the preferences setup.
UPLOAD FILES Tab
This tab contains different sub-sections which helps us to perform upload process. User needs to select individual files from local disk and assign few configurations before uploading them to S3 Bucket. Below are the steps which describes about the upload process :
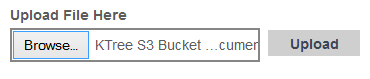
Step 1 : Select a file from local disk and upload it.
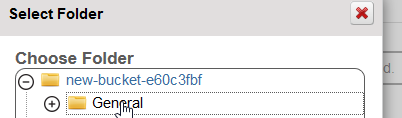
Step 2 : Select S3 folder, It is mandatory to select this.

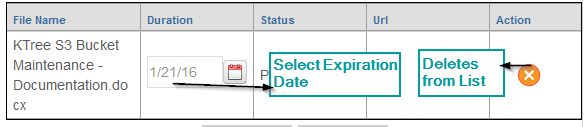
Step 3 : We can set the expiration date to S3 document and can also delete it if we don’t want to add the required document to S3 Bucket.
In this process we can add any number of files and can submit all of them at a time. After submitting the list of documents to S3 bucket then we can find the URL (S3 object URL) of the document which allows users to access the document with in the web browser.
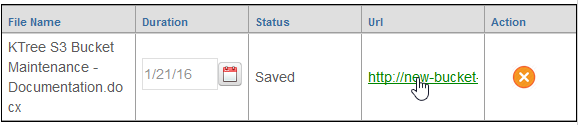
Once after selecting the URL mentioned, a document will be displayed or a new tab will be opened in the browser which will display a request to download the file . After submitting the process inorder to clear the existing content of data on ‘Upload Files’ tab we need to reset it.
Manage Files:
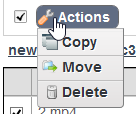
This tab is responsible to display S3 Bucket (selected bucket in preferences) folders, sub-folders and documents. We can perform certain operations with this tab. Below are list of S3 bucket actions that we can perform,
Actions:
Folder Actions :
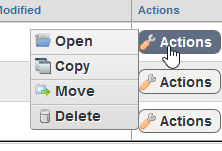
- Open : Opens the folder or navigate to sub-folders.
- Copy : Copies content of a folder to other folder.
- Move : Moves content of a folder to other folder.
- Delete : Deletes a Folder from S3 bucket.
Document Actions :
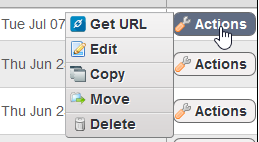
- Get URL: Opens a popup window to use an existing URL or create a new pre-signed URL.
- Edit : Edit the title of the document and can also assign Liferay tags or categories. This information will be stored within the S3 object metadata info.
- Copy : To copy a document from one place to another.
- Move : To move a document from one place to other.
- Delete : Deletes the selected document from S3 bucket.
Above actions can be performed individually or through multi selection. We can also perform some actions on folders or documents with multi selection. Please check the below screenshot on list of available actions.